1 | /** |
今天我们要分析的源码是插件加载部分1
pluginFinder = new PluginFinder(new PluginBootstrap().loadPlugins());
PluginBootstrap 是一个插件查找器,使用 PluginResourcesResolver 查找所有插件,使用 PluginCfg 加载所有插件。
抽象类定义属性,并为属性提供 Setter 和 Getter 方法,子类通过构造方法内调用super(xx)将属性赋值给父类。
Do one thing, do it well.
1 | /** |
今天我们要分析的源码是插件加载部分1
pluginFinder = new PluginFinder(new PluginBootstrap().loadPlugins());
PluginBootstrap 是一个插件查找器,使用 PluginResourcesResolver 查找所有插件,使用 PluginCfg 加载所有插件。
抽象类定义属性,并为属性提供 Setter 和 Getter 方法,子类通过构造方法内调用super(xx)将属性赋值给父类。
SkyWalking Java Agent 配置初始化流程分析
上一篇文章我们通过 SkyWalking Java Agent 日志组件分析一文详细介绍了日志相关的底层实现原理,今天我们要正式进入 premain 方法了,
premain 方法见名知义就是在我们 Java 程序的 main 方法之前运行的方法,一般我们通过 JVM 参数 -javaagent:/path/to/skywalking-agent.jar 的方式指定代理程序。
java agent 相关内容不是本文重点,更多内容请参考文末相关阅读连接。
1 | /** |
今天我们要重点分析的就是这行代码的内部实现1
SnifferConfigInitializer.initializeCoreConfig(agentArgs);
SnifferConfigInitializer 类使用多种方式初始化配置,内部实现有以下几个重要步骤:
loadConfig() 加载配置文件
replacePlaceholders() 解析 placeholder
overrideConfigBySystemProp() 读取 System.Properties 属性
overrideConfigByAgentOptions() 解析 agentArgs 参数配置
initializeConfig() 将以上读取到的配置信息映射到 Config 类的静态属性
configureLogger() 根据配置的 Config.Logging.RESOLVER 重配置 Log,更多关于日志参见文章
验证非空参数 agent.service_name 和 collector.servers。
将配置文件内容加载到 Properties;
从系统属性读取配置覆盖配置;
解析 agentArgs 覆盖配置;
将配置信息映射到 Config 类的静态属性;
必填参数验证。
读取默认配置文件,以及后面加载插件都需要用到 SkyWalking agent.jar 所在目录
skywalking-agent 目录结构如下:
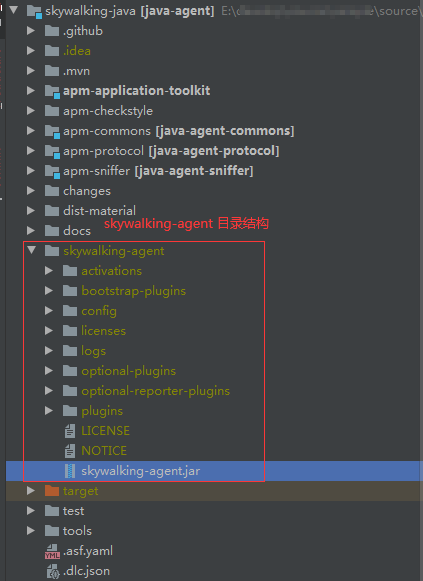
config 目录存放的是 agent.config 配置文件
1 | /** |
new File(AgentPackagePath.getPath(), DEFAULT_CONFIG_FILE_NAME) 定位默认配置文件的位置,
AgentPackagePath.getPath() 方法用来获取 skywalking-agent.jar 所在目录,其中涉及到一些的字符串操作,大家对这部分感兴趣的可以看源码研究。
1 | /** |
Agent Options > System.Properties(-D) > System environment variables > Config file
System.getProperties() 和 System.getenv() 区别
System.getProperties() 获取 Java 虚拟机相关的系统属性(比如 java.version、 java.io.tmpdir 等),通过 java -D配置;
System.getenv() 获取系统环境变量(比如 JAVA_HOME、Path 等),通过操作系统配置。
请参考 https://www.cnblogs.com/clarke157/p/6609761.html
在我们的日常开发中一般是直接从 Properties 读取需要的配置项,SkyWalking Java Agent 并没有这么做,而是定义一个配置类 Config,将配置项映射到 Config 类的静态属性中,
其他地方需要配置项的时候,直接从类的静态属性获取就可以了,非常方便使用。
ConfigInitializer 就是负责将 Properties 中的 key/value 键值对映射到类(比如 Config 类)的静态属性,其中 key 对应类的静态属性,value 赋值给静态属性的值。
1 | /** |
比如通过 agent.config 配置文件配置服务名称1
2# The service name in UI
agent.service_name=${SW_AGENT_NAME:Your_ApplicationName}
agent 对应 Config 类的静态内部类 Agent
service_name 对应静态内部类 Agent 的静态属性 SERVICE_NAME
SkyWalking Java Agent 在这里面使用了下划线而不是驼峰来命名配置项,将类的静态属性名称转换成下划线配置名称非常方便,直接转成小写就可以通过 Properties 获取对应的值了。
ConfigInitializer.initNextLevel 方法涉及到的技术点有反射、递归调用、栈等,更多实现细节参考 ConfigInitializer 类源码1
2
3
4
5
6
7
8
9
10
11
12
13
14
15
16
17
18
19
20
21
22
23
24
25
26
27
28
29
30
31
32
33
34
35
36
37
38
39
40
41
42
43
44
45
46
47
48
49
50
51
52
53
54
55
56
57
58
59
60
61
62
63
64
65
66
67
68
69
70
71
72
73
74
75
76
77
78
79
80
81
82
83
84
85
86
87/**
* Init a class's static fields by a {@link Properties}, including static fields and static inner classes.
* <p>
*/
public class ConfigInitializer {
public static void initialize(Properties properties, Class<?> rootConfigType) throws IllegalAccessException {
initNextLevel(properties, rootConfigType, new ConfigDesc());
}
private static void initNextLevel(Properties properties, Class<?> recentConfigType,
ConfigDesc parentDesc) throws IllegalArgumentException, IllegalAccessException {
for (Field field : recentConfigType.getFields()) {
if (Modifier.isPublic(field.getModifiers()) && Modifier.isStatic(field.getModifiers())) {
String configKey = (parentDesc + "." + field.getName()).toLowerCase();
Class<?> type = field.getType();
if (type.equals(Map.class)) {
/*
* Map config format is, config_key[map_key]=map_value
* Such as plugin.opgroup.resttemplate.rule[abc]=/url/path
*/
// Deduct two generic types of the map
ParameterizedType genericType = (ParameterizedType) field.getGenericType();
Type[] argumentTypes = genericType.getActualTypeArguments();
Type keyType = null;
Type valueType = null;
if (argumentTypes != null && argumentTypes.length == 2) {
// Get key type and value type of the map
keyType = argumentTypes[0];
valueType = argumentTypes[1];
}
Map map = (Map) field.get(null);
// Set the map from config key and properties
setForMapType(configKey, map, properties, keyType, valueType);
} else {
/*
* Others typical field type
*/
String value = properties.getProperty(configKey);
// Convert the value into real type
final Length lengthDefine = field.getAnnotation(Length.class);
if (lengthDefine != null) {
if (value != null && value.length() > lengthDefine.value()) {
value = value.substring(0, lengthDefine.value());
}
}
Object convertedValue = convertToTypicalType(type, value);
if (convertedValue != null) {
// 通过反射给静态属性设置值
field.set(null, convertedValue);
}
}
}
}
// recentConfigType.getClasses() 获取 public 的 classes 和 interfaces
for (Class<?> innerConfiguration : recentConfigType.getClasses()) {
// parentDesc 将类(接口)名入栈
parentDesc.append(innerConfiguration.getSimpleName());
// 递归调用
initNextLevel(properties, innerConfiguration, parentDesc);
// parentDesc 将类(接口)名出栈
parentDesc.removeLastDesc();
}
}
// 省略部分代码....
}
class ConfigDesc {
private LinkedList<String> descs = new LinkedList<>();
void append(String currentDesc) {
if (StringUtil.isNotEmpty(currentDesc)) {
descs.addLast(currentDesc);
}
}
void removeLastDesc() {
descs.removeLast();
}
@Override
public String toString() {
return String.join(".", descs);
}
}
阅读源码过程对部分代码添加的注释已经提交到 GitHub 上了,我就不在此贴太多代码了,具体参见 https://github.com/geekymv/skywalking-java/tree/v8.8.0-annotated
基于 SkyWalking Java Agent 8.8.0 版本
SkyWalkingAgent 类是 SkyWalking Java Agent 的入口 premain 方法所在类,今天我们要分析的不是 premain 方法,而是任何一个应用程序都需要的日志框架,SkyWalking Java Agent 并没有依赖现有的日志框架如 log4j 之类的,而是自己实现了一套。
1 | /** |
SkyWalkingAgent 类的第一行代码就是自己实现的日志组件,看起来和其他常用的日志组件的使用方式没什么区别。1
private static ILog LOGGER = LogManager.getLogger(SkyWalkingAgent.class);
首先通过日志管理器 LogManager 获取 ILog 接口的一个具体实现,这是典型的Java多态 - 父类(接口)的引用指向子类的实现。
ILog 接口提供了我们常用的打印日志的方法,定义了一套日志使用规范。
1 | /** |
我们看下 LogManager 类的具体实现
1 | /** |
LogManager 类是 LogResolver 实现类的管理器,通过使用 LogResolver,LogManager.getLogger(Class) 返回了 ILog 接口的一个实现,LogManager 类是日志组件的主要入口,内部封装了日志组件的实现细节。
LogManager 内部提供了setLogResolver 方法用于注册指定的 LogResolver,如果设置 LogResolver 为 null,则返回 NoopLogger 实例。
LogResolver 只是返回 ILog 接口的实现1
2
3
4
5
6
7
8
9
10
11
12
13
14
15
16
17/**
* {@link LogResolver} just do only one thing: return the {@link ILog} implementation.
* <p>
*/
public interface LogResolver {
/**
* @param clazz the class is showed in log message.
* @return {@link ILog} implementation.
*/
ILog getLogger(Class<?> clazz);
/**
* @param clazz the class is showed in log message.
* @return {@link ILog} implementation.
*/
ILog getLogger(String clazz);
}
LogResolver 接口目前提供了2个实现类:PatternLogResolver 、JsonLogResolver 分别返回 PatternLogger 和 JsonLogger。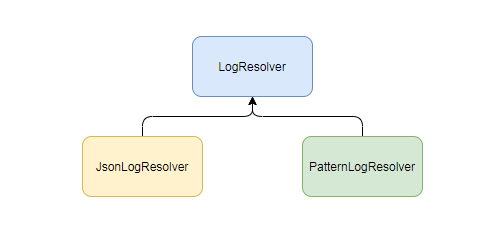
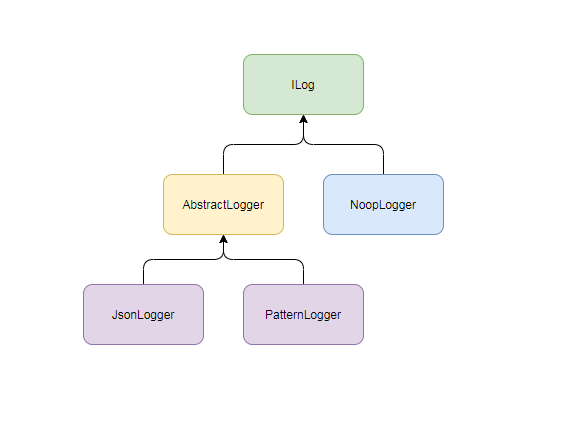
NoopLogger 枚举
NoopLogger 直接继承了 ILog,NoopLogger 只是实现了 ILog 接口,所有方法都是空实现,NoopLogger 存在的意义是为了防止 NullPointerException,因为调用者可以通过 LogManager 的 setLogResolver 方法设置不同的日志解析器 LogResolver,如果为null,则返回 ILog 接口的默认实现 NoopLogger。
AbstractLogger 抽象类
AbstractLogger 抽象类是为了简化 ILog 接口的具体实现,主要功能:
输出的日志格式1
%level %timestamp %thread %class : %msg %throwable
每一项代表的意义如下:1
2
3
4
5
6
7%level 日志级别.
%timestamp 时间戳 yyyy-MM-dd HH:mm:ss:SSS 格式.
%thread 线程名.
%msg 用户指定的日志信息.
%class 类名.
%throwable 异常信息.
%agent_name agent名称.
对于日志格式中的每一项, SkyWalking Java Agent 分别提供了对应的转换器解析,比如 ThreadConverter、LevelConverter 等。
1 | /** |
比如 ThreadConverter 类用于解析 %thread 输出当前线程的 name。
1 | /** |
AbstractLogger 类实现了 ILog 接口,实现了打印日志方法,最终都调用了下面这个通用的方法
1 | protected void logger(LogLevel level, String message, Throwable e) { |
其中 logger 方法内部调用了 format 方法,format 是一个抽象方法,留给子类去实现日志输出的格式,返回字符串的字符串将输出到文件或标准输出。1
2
3
4
5
6
7
8
9
10
11 /**
* The abstract method left for real loggers.
* Any implementation MUST return string, which will be directly transferred to log destination,
* i.e. log files OR stdout
*
* @param level log level
* @param message log message, which has been interpolated with user-defined parameters.
* @param e throwable if exists
* @return string representation of the log, for example, raw json string for {@link JsonLogger}
*/
protected abstract String format(LogLevel level, String message, Throwable e);
抽象类对接口中的方法做了实现,每个实现中都调用了一个抽象方法,这个抽象方法让子类来实现具体的业务逻辑。
下面是 AbstractLogger 抽象类其中一个实现类 PatternLogger 类对 format 方法的实现,调用转换器相应的 Converter ,将日志拼接成字符串。
1 | @Override |
PatternLogger 将日志格式 pattern 转换成对应的转换器 Converter 是在 PatternLogger.setPattern 方法实现的,内部调用了 Parser.parse 方法,具体实现参见 Parser 类源码。
日志已经拼装完毕,接下来就该将日志内容输出到指定的位置,WriterFactory 工厂类就是负责创建 IWriter 接口的实现类,用于将日志信息写入到目的地。
1 | public interface IWriter { |
IWriter 接口有2种实现 FileWriter 和 SystemOutWriter
FileWriter:使用一个阻塞队列 ArrayBlockingQueue 作为缓冲,线程池 ScheduledExecutorService 异步从队列中取出日志信息,使用 FileOutputStream 将日志信息写入日志文件中,典型的生产者-消费者模式;
SystemOutWriter:将日志信息输出到控制台;
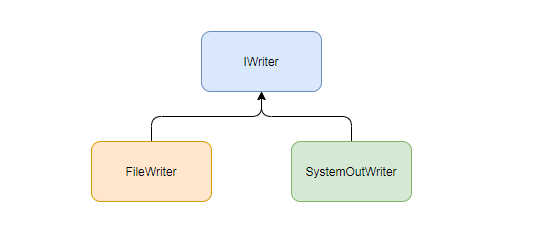
下面我们看下 FileWriter 是如何将日志写入日志文件的
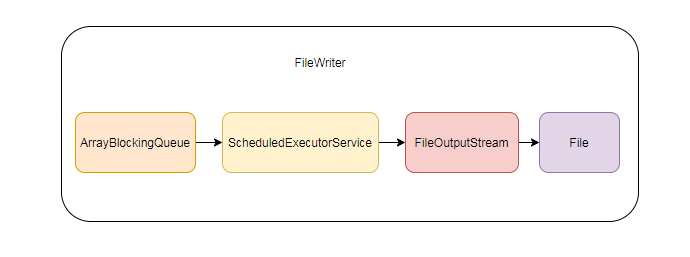
FileWriter 负责将日志信息写入 ArrayBlockingQueue 队列中
ScheduledExecutorService 定时任务
a)每秒从 ArrayBlockingQueue 取出所有日志信息,写入到文件中;
b)判断文件大小是否超过最大值Config.Logging.MAX_FILE_SIZE;
c)如果超过最大值将当前文件重命名。
1 | /** |

好了,今天的内容就到这里了,看完之后自己是否也能模仿写一个日志组件呢
垃圾收集器
Java堆内存分为新生代和老年代,新生代主要存储短生命周期的对象,适合使用复制算法进行垃圾回收;老年代主要存储长生命周期的对象,适合使用标记整理算法进行垃圾回收。
JVM针对新生代和老年代分别提供了不同的垃圾收集器。新生代垃圾收集器有Serial、ParNew 和 Parallel Scavenge,老年代垃圾收集器有 Serial Old、Parallel Old、CMS,还有针对不同区域的G1分区收集算法。

新生代垃圾收集器
Serial
单线程,复制算法,简单高效,没有线程交互开销。
垃圾收集时,必须暂停其他所有用户线程(Stop The World),直到它收集结束。
Java 虚拟机在 Client 模式下新生代的默认垃圾收集器。
ParNew
多线程,复制算法。ParNew 垃圾收集器是 Serial 垃圾收集器的多线程实现,它采用多线程模式工作,其他和 Serial 几乎一样。
除了 Serial 收集器外,目前只有它能与 CMS 收集器配合工作。
Parallel Scavenge
多线程,复制算法,Java8 默认的垃圾收集器。
吞吐量优先的垃圾收集器,主要适合在后台运算而不需要太多交互的分析任务。
自适应调节策略(GC Ergonomics),不需要指定新生代大小(-Xmn)、Eden 与 Survivor 的比例(-XX:SurvivorRatio)、晋升老年代对象大小(-XX:PretenureSizeThreshold)等细节参数,虚拟机会动态调整这些参数以提供最合适的停顿时间或者最大吞吐量。
1 | Stop The World (STW)由虚拟机在后台自动发起自动完成的,在用户不可知、不可控的情况下把用户的正常用户线程全部停掉,这对很多应用来说是不可接受的。 |
老年代垃圾收集器
CMS(Concurrent Mark Sweep)
第一款实际意义上支持并发的垃圾收集器,它首次实现了让垃圾收集线程和用户线程(基本上)同时工作。
标记清除算法,关注点是尽可能缩短用户线程的停顿时间,停顿时间越短越适合需要与用户交互或需要保证服务响应质量的程序,适合互联网应用的服务端。
①初始标记(CMS initial mark):只标记和 GC Roots 能直接关联到的对象,速度很快,需要暂停所有用户线程;
②并发标记(CMS concurrent mark):从 GC Roots 的直接关联对象开始遍历整个对象图的过程,耗时较长单不需要暂停用户线程;
③重新标记(CMS remark):在并发标记过程中用户线程继续运行,导致垃圾收集过程中部分对象的状态发生了变化,为了确保这部分对象的状态的正确性,需要重新标记并暂停用户线程。
④并发清除(CMS concurrent sweep):和用户线程一起工作,清理删除掉标记阶段判断的可以回收的对象,不需要暂停用户线程。
初始标记和重新标记阶段会暂停用户线程,但速度很快;
并发标记和并发清除不需要暂停用户线程,有效地缩短了垃圾回收时系统的停顿时间;
从总体上来说,CMS收集器回收过程是与用户线程一起并发执行的。
1 | -XX:+UseConcMarkSweepGC |
要是CMS运行
G1(Garbage First)
多线程标记整理算法。
G1 是一个面向全堆的收集器,不需要其他新生代收集器的配合工作,自JDK9开始,ParNew + CMS 收集器的组合不再是官方推荐的服务端模式下的收集器解决方案了,官方希望它能完全被 G1 所取代,甚至取消了 ParNew + Serial Old 以及 Serial + CMS 组合了的支持(很少有人这么用)。只剩下 ParNew + CMS 互相搭配使用。
相较于CMS垃圾收集器,G1收集器的两个突出的改进:
垃圾收集器中的并行与并发
并行(Parallel):并行描述的是多条垃圾收集器线程之间的关系,说明同一时间有多条这样的线程在协同工作,通常默认此时用户线程是处理等待状态,程序无法响应服务请求。
并发(Concurrent):并发描述的是垃圾收集器线程与用户线程之间的关系,说明同一时间垃圾收集器线程与用户线程都在运行。用户线程仍在运行,所以程序仍然能响应服务请求,由于垃圾收集器线程占用了一部分系统资源,此时应用程序的处理的吞吐量将受到一定的影响。
com.netflix.discovery.shared.resolver.ResolverUtils 类
1 | /** |
com.netflix.discovery.DiscoveryClient 类
创建线程池1
2
3
4
5
6
7
8
9
10
11
12
13
14
15
16
17
18
19
20
21
22
23
24// default size of 2 - 1 each for heartbeat and cacheRefresh
scheduler = Executors.newScheduledThreadPool(2,
new ThreadFactoryBuilder()
.setNameFormat("DiscoveryClient-%d")
.setDaemon(true)
.build());
heartbeatExecutor = new ThreadPoolExecutor(
1, clientConfig.getHeartbeatExecutorThreadPoolSize(), 0, TimeUnit.SECONDS,
new SynchronousQueue<Runnable>(),
new ThreadFactoryBuilder()
.setNameFormat("DiscoveryClient-HeartbeatExecutor-%d")
.setDaemon(true)
.build()
); // use direct handoff
cacheRefreshExecutor = new ThreadPoolExecutor(
1, clientConfig.getCacheRefreshExecutorThreadPoolSize(), 0, TimeUnit.SECONDS,
new SynchronousQueue<Runnable>(),
new ThreadFactoryBuilder()
.setNameFormat("DiscoveryClient-CacheRefreshExecutor-%d")
.setDaemon(true)
.build()
); // use direct handoff
Eureka 每30s 执行一次renew操作
EurekaHttpClient 接口
ThreadPoolExecutor Javadoc解读
An ExecutorService that executes each submitted task using one of possibly several pooled threads, normally configured using Executors factory methods.
ExecutorService 使用池线程执行提交的任务
Thread pools address two different problems:
they usually provide improved performance when executing large numbers of asynchronous tasks, due to reduced per-task invocation overhead, and they provide a means of bounding and managing the resources, including threads, consumed when executing a collection of tasks.
Each ThreadPoolExecutor also maintains some basic statistics, such as the number of completed tasks.
线程池解决了两个问题:
在执行大量异步任务时提供更好的性能,因为每个任务调用开销减少了;
提供了限制和管理资源的方法,包括执行任务消耗的线程。
To be useful across a wide range of contexts, this class provides many adjustable parameters and extensibility hooks. However, programmers are urged to use the more convenient Executors factory methods
Executors.newCachedThreadPool (unbounded thread pool, with automatic thread reclamation),
Executors.newFixedThreadPool (fixed size thread pool) and Executors.newSingleThreadExecutor (single background thread), that preconfigure settings for the most common usage scenarios.
Otherwise, use the following guide when manually configuring and tuning this class:
ThreadPoolExecutor 提供了许多可调整的参数和扩展的钩子方法。
Executors 提供了一些创建线程池的工厂方法:
Executors.newCachedThreadPool() 无界线程池,自动回收线程
Executors.newFixedThreadPool() 固定大小的线程池
Executors.newSingleThreadExecutor() 单线程池
A ThreadPoolExecutor will automatically adjust the pool size (see getPoolSize) according to
the bounds set by corePoolSize (see getCorePoolSize) and maximumPoolSize (see getMaximumPoolSize).
When a new task is submitted in method execute(Runnable), and fewer than corePoolSize threads are running, a new thread is created to handle the request, even if other worker threads are idle.
ThreadPoolExecutor 根据 corePoolSize和 maximumPoolSize参数自动调整线程池大小。
当通过execute(Runnable) 方法提交一个新的任务,并且少于corePoolSize数量的线程在运行,会创建一个新的线程处理请求任务,即使其他工作线程空闲。
(也就是说当线程池中的线程数小于核心线程数,当有新的任务要处理时都会创建新的线程)。
If there are more than corePoolSize but less than maximumPoolSize threads running, a new thread will be created only if the queue is full. By setting corePoolSize and maximumPoolSize the same, you create a fixed-size thread pool. By setting maximumPoolSize to an essentially unbounded value such as Integer.MAX_VALUE, you allow the pool to accommodate an arbitrary number of concurrent tasks.
Most typically,core and maximum pool sizes are set only upon construction, but they may also be changed dynamically using setCorePoolSize and setMaximumPoolSize.
如果线程池中有超过核心线程数但是小于最大线程数的线程在运行,只有当队列满了才会创建新的线程。
(也就是说当线程池中的线程数等于核心线程数,对于新提交的任务会进入队列排队,直到队列满了,才会创建新的线程处理新来的任务)
通过 setCorePoolSize 和 setMaximumPoolSize 方法可以动态调整核心线程和最大线程的数量。
By default, even core threads are initially created and started only when new tasks arrive,
but this can be overridden dynamically using method prestartCoreThread or prestartAllCoreThreads.
You probably want to prestart threads if you construct the pool with a non-empty
默认情况下,当新的任务到达时创建并启动核心线程,也可以使用 prestartCoreThread 或 prestartAllCoreThreads 方法提前创建线程。
New threads are created using a ThreadFactory. If not otherwise specified, a Executors.defaultThreadFactory is used, that creates threads to all be in the same ThreadGroup and with the same NORM_PRIORITY priority and non-daemon status. By supplying a different ThreadFactory, you can alter the thread’s name, thread group, priority, daemon status, etc. If a ThreadFactory fails to create a thread when asked by returning null from newThread, the executor will continue, but might not be able to execute any tasks. Threads should possess the “modifyThread” RuntimePermission.
If worker threads or other threads using the pool do not possess this permission, service may be degraded:
configuration changes may not take effect in a timely manner, and a shutdown pool may remain in a state in which termination is possible but not completed.
使用ThreadFactory创建线程,默认使用 Executors的 defaultThreadFactory方法创建 DefaultThreadFactory 对象。
通过自定义 ThreadFactory 可以指定 线程名称,线程组,优先级,是否守护线程 等等。
If the pool currently has more than corePoolSize threads, excess threads will be terminated
if they have been idle for more than the keepAliveTime (see getKeepAliveTime(TimeUnit)).
This provides a means of reducing resource consumption when the pool is not being actively used.
If the pool becomes more active later, new threads will be constructed. This parameter can also be changed dynamically using method setKeepAliveTime(long, TimeUnit).
Using a value of Long.MAX_VALUE TimeUnit.NANOSECONDS effectively disables idle threads from ever terminating prior to shut down. By default, the keep-alive policy applies only when there are more than corePoolSize threads. But method allowCoreThreadTimeOut(boolean) can be used to apply this time-out policy to core threads as well, so long as the keepAliveTime value is non-zero
如果线程池中的线程数超过核心线程大小,空闲时间超过 keepAliveTime 的多余线程会被终止,
keepAliveTime的值可以通过 setKeepAliveTime(long, TimeUnit) 方法动态调整。
默认情况下,keep-alive 策略只会作用于超过核心线程数的线程, allowCoreThreadTimeOut(boolean) 方法会改变time-out策略将空闲的核心线程也回收。
Any BlockingQueue may be used to transfer and hold submitted tasks. The use of this queue interacts with pool sizing:
BlockingQueue 用于转换和存储提交的任务
如果正在运行的线程数小于核心线程数,Executor 会创建一个线程执行新的请求任务;
如果正在运行的线程数大于等于核心线程数,Executor 会将请求任务放入队列;
如果队列满了请求无法入队,会创建新的线程执行任务,当线程数超过maximumPoolSize,将执行任务拒绝策略 RejectedExecutionHandler。
There are three general strategies for queuing:
Direct handoffs.
A good default choice for a work queue is a SynchronousQueue that hands off tasks to threads without otherwise holding them. Here, an attempt to queue a task will fail if no threads are immediately available to run it, so a new thread will be constructed.
This policy avoids lockups when handling sets of requests that might have internal dependencies.
Direct handoffs generally require unbounded maximumPoolSizes to avoid rejection of new submitted tasks.
This in turn admits the possibility of unbounded thread growth when commands continue to arrive on average faster than they can be processed.
Unbounded queues.
Using an unbounded queue (for example a LinkedBlockingQueue without a predefined capacity) will cause new tasks
to wait in the queue when all corePoolSize threads are busy. Thus, no more than corePoolSize threads will ever be created.
(And the value of the maximumPoolSize therefore doesn’t have any effect.) This may be appropriate when each task is completely independent of others,
so tasks cannot affect each others execution; for example, in a web page server.
While this style of queuing can be useful in smoothing out transient bursts of requests,
it admits the possibility of unbounded work queue growth when commands continue to arrive on average faster than they can be processed.
Bounded queues.
A bounded queue (for example, an ArrayBlockingQueue) helps prevent resource exhaustion when used with finite maximumPoolSizes,
but can be more difficult to tune and control.
Queue sizes and maximum pool sizes may be traded off for each other:
Using large queues and small pools minimizes CPU usage, OS resources, and context-switching overhead, but can lead to artificially low throughput.
If tasks frequently block (for example if they are I/O bound), a system may be able to schedule time for more threads than you otherwise allow.
Use of small queues generally requires larger pool sizes, which keeps CPUs busier but may encounter unacceptable scheduling overhead, which also decreases throughput.
常用的3种队列
New tasks submitted in method execute(Runnable) will be rejected when the Executor has been shut down,
and also when the Executor uses finite bounds for both maximum threads and work queue capacity, and is saturated.
In either case, the execute method invokes the RejectedExecutionHandler.rejectedExecution(Runnable, ThreadPoolExecutor) method of its RejectedExecutionHandler.
Four predefined handler policies are provided:
新的任务提交,当Executor已经关闭的时候 或 有界队列满了并且线程达到最大线程数,会执行拒绝策略 RejectedExecutionHandler.rejectedExecution(Runnable r, ThreadPoolExecutor executor)。
JDK提供了4个拒绝策略
ThreadPoolExecutor.AbortPolicy:默认拒绝策略,抛出RejectedExecutionException异常。
ThreadPoolExecutor.CallerRunsPolicy:调用者执行,调用execute方法的线程自己执行任务,会降低任务提交的速度。
ThreadPoolExecutor.DiscardPolicy:丢弃当前任务。
ThreadPoolExecutor.DiscardOldestPolicy:丢弃队列头的任务,再次执行当前任务。
可以自定义实现其他种类的 RejectedExecutionHandler的实现,其他实现参考 https://cloud.tencent.com/developer/article/1520860
This class provides protected overridable beforeExecute(Thread, Runnable) and afterExecute(Runnable, Throwable) methods that are called before and after execution of each task.
These can be used to manipulate the execution environment; for example, reinitializing ThreadLocals, gathering statistics, or adding log entries. Additionally, method terminated can be overridden to perform any special processing that needs to be done once the Executor has fully terminated.
If hook or callback methods throw exceptions, internal worker threads may in turn fail and abruptly terminate.
ThreadPoolExecutor 类提供了 beforeExecute 和 afterExecute 方法在任务执行前后会执行,子类可以重写这两个方法做一些统计、日志等。
Method getQueue() allows access to the work queue for purposes of monitoring and debugging.
Use of this method for any other purpose is strongly discouraged. Two supplied methods, remove(Runnable) and purge are available to assist in storage reclamation when large numbers of queued tasks become cancelled.
getQueue() 方法允许访问工作队列,可以用于监控和调试。
A pool that is no longer referenced in a program AND has no remaining threads will be shutdown automatically. If you would like to ensure that unreferenced pools are reclaimed even if users forget to call shutdown, then you must arrange that unused threads eventually die, by setting appropriate keep-alive times, using a lower bound of zero core threads and/or setting allowCoreThreadTimeOut(boolean).
The main pool control state, ctl, is an atomic integer packing two conceptual fields
In order to pack them into one int, we limit workerCount to (2^29)-1 (about 500 million) threads rather than (2^31)-1 (2 billion) otherwise representable. If this is ever an issue in the future, the variable can be changed to be an AtomicLong, and the shift/mask constants below adjusted. But until the need arises, this code is a bit faster and simpler using an int.
The workerCount is the number of workers that have been permitted to start and not permitted to stop. The value may be transiently different from the actual number of live threads, for example when a ThreadFactory fails to create a thread when asked, and when exiting threads are still performing bookkeeping before terminating. The user-visible pool size is reported as the current size of the workers set.
The runState provides the main lifecycle control, taking on values:
The numerical order among these values matters, to allow ordered comparisons. The runState monotonically increases over time, but need not hit each state. The transitions are:
Threads waiting in awaitTermination() will return when the state reaches TERMINATED.
Detecting the transition from SHUTDOWN to TIDYING is less straightforward than you’d like because the queue may become empty after non-empty and vice versa during SHUTDOWN state, but we can only terminate if, after seeing that it is empty, we see that workerCount is 0 (which sometimes entails a recheck – see below).
ThreadPoolExecutor 中的成员变量ctl 包含两部分
1 | private final AtomicInteger ctl = new AtomicInteger(ctlOf(RUNNING, 0)); |
workerCount: 工作线程数量
runState:线程池运行状态
RUNNING:接收新任务并处理队列里的任务
SHUTDOWN:不接受新任务,处理队列任务
STOP:不接受新任务,不处理队列任务,中断正在执行的任务
TIDYING:所有任务已经终止,workerCount是0,线程状态转换为TIDYING,将运行terminated()钩子方法
TERMINATED:terminated() 钩子方法已经完成
RUNNING -> SHUTDOWN 调用shutdown()方法
RUNNING / SHUTDOWN -> STOP 调用shutdownNow()方法
SHUTDOWN -> TIDYING 队列和线程池为空
STOP -> TIDYING 线程池为空
TIDYING -> TERMINATED terminated()钩子方法已经完成。
更多详细信息参见 java.util.concurrent.ThreadPoolExecutor 的Javadoc。
Redis cluster tutorial Redis官方文档解读
This document is a gentle introduction to Redis Cluster, that does not use difficult to understand concepts of distributed systems. It provides instructions about how to setup a cluster, test, and operate it, without going into the details that are covered in the Redis Cluster specification but just describing how the system behaves from the point of view of the user.
However this tutorial tries to provide information about the availability and consistency characteristics of Redis Cluster from the point of view of the final user, stated in a simple to understand way.
Note this tutorial requires Redis version 3.0 or higher.
If you plan to run a serious Redis Cluster deployment, the more formal specification is a suggested reading, even if not strictly required. However it is a good idea to start from this document, play with Redis Cluster some time, and only later read the specification.
Redis Cluster provides a way to run a Redis installation where data is automatically sharded across multiple Redis nodes.
Redis Cluster also provides some degree of availability during partitions, that is in practical terms the ability to continue the operations when some nodes fail or are not able to communicate. However the cluster stops to operate in the event of larger failures (for example when the majority of masters are unavailable).
So in practical terms, what do you get with Redis Cluster?
1 | 数据自动分片到多个节点 |
Every Redis Cluster node requires two TCP connections open. The normal Redis TCP port used to serve clients, for example 6379, plus the port obtained by adding 10000 to the data port, so 16379 in the example.
This second high port is used for the Cluster bus, that is a node-to-node communication channel using a binary protocol. The Cluster bus is used by nodes for failure detection, configuration update, failover authorization and so forth. Clients should never try to communicate with the cluster bus port, but always with the normal Redis command port, however make sure you open both ports in your firewall, otherwise Redis cluster nodes will be not able to communicate.
The command port and cluster bus port offset is fixed and is always 10000.
Note that for a Redis Cluster to work properly you need, for each node:
If you don’t open both TCP ports, your cluster will not work as expected.
The cluster bus uses a different, binary protocol, for node to node data exchange, which is more suited to exchange information between nodes using little bandwidth and processing time.
1 | 每一个Redis Cluster节点有2个端口,命令端口(command port)比如6379,用于服务客户端,集群总线端口(cluster bus port) 等于命令端口加上10000,即16379,用于节点之间数据交换。 |
Currently Redis Cluster does not support NATted environments and in general environments where IP addresses or TCP ports are remapped.
Docker uses a technique called port mapping: programs running inside Docker containers may be exposed with a different port compared to the one the program believes to be using. This is useful in order to run multiple containers using the same ports, at the same time, in the same server.
In order to make Docker compatible with Redis Cluster you need to use the host networking mode of Docker. Please check the --net=host option in the Docker documentation for more information.
Redis Cluster does not use consistent hashing, but a different form of sharding where every key is conceptually part of what we call a hash slot.
There are 16384 hash slots in Redis Cluster, and to compute what is the hash slot of a given key, we simply take the CRC16 of the key modulo 16384.
Every node in a Redis Cluster is responsible for a subset of the hash slots, so for example you may have a cluster with 3 nodes, where:
This allows to add and remove nodes in the cluster easily. For example if I want to add a new node D, I need to move some hash slot from nodes A, B, C to D. Similarly if I want to remove node A from the cluster I can just move the hash slots served by A to B and C. When the node A will be empty I can remove it from the cluster completely.
Because moving hash slots from a node to another does not require to stop operations, adding and removing nodes, or changing the percentage of hash slots hold by nodes, does not require any downtime.
Redis Cluster supports multiple key operations as long as all the keys involved into a single command execution (or whole transaction, or Lua script execution) all belong to the same hash slot. The user can force multiple keys to be part of the same hash slot by using a concept called hash tags.
Hash tags are documented in the Redis Cluster specification, but the gist is that if there is a substring between {} brackets in a key, only what is inside the string is hashed, so for example this{foo}key and another{foo}key are guaranteed to be in the same hash slot, and can be used together in a command with multiple keys as arguments.
1 | Redis Cluster 没有使用一致性Hash算法,而是使用Hash slot 实现数据分片,一个集群共有16384个hash slots。 |
In order to remain available when a subset of master nodes are failing or are not able to communicate with the majority of nodes, Redis Cluster uses a master-slave model where every hash slot has from 1 (the master itself) to N replicas (N-1 additional slaves nodes).
In our example cluster with nodes A, B, C, if node B fails the cluster is not able to continue, since we no longer have a way to serve hash slots in the range 5501-11000.
However when the cluster is created (or at a later time) we add a slave node to every master, so that the final cluster is composed of A, B, C that are master nodes, and A1, B1, C1 that are slave nodes. This way, the system is able to continue if node B fails.
Node B1 replicates B, and B fails, the cluster will promote node B1 as the new master and will continue to operate correctly.
However, note that if nodes B and B1 fail at the same time, Redis Cluster is not able to continue to operate.
1 | Redis Cluster 使用主从模式,每个hash slot 有1~N个副本,其中1个master和 N-1个 slaves |

是的,线上环境出问题了,调用第三方的接口出现服务端响应状态码401,于是赶紧查询HTTP Code 401代表啥意思,于是找到了这篇文章
http常见的状态码,400,401,403状态码分别代表什么?
1 | 401 unauthorized,表示发送的请求需要有通过 HTTP 认证的认证信息 |
401是服务端响应的状态码,根据接口文档在请求header中添加 X_API_KEY用于接口验证,代码中也确实这么实现的。

而且同样的接口本地发送请求没有问题,这里是使用Hutool(3.3.2版本)工具包发送HTTP请求,调用第三方接口抓取数据。
于是想到了抓包看看,项目代码是部署在Linux服务器(IP是192.168.0.211)上的,无法使用Wireshark之类图形化工具,于是使用tcpdump命令去抓包。
1 | tcpdump -i eth0 tcp port 80 and host 192.168.67.206 -w /tmp/httptool-206.pcap |
将抓的数据包传输到本地使用Wireshark打开如下

第4行就是发出的HTTP GET请求,注意下这里发出的请求header中携带了cookie信息,而代码中并没有去设置cookie,那么这个cookie是怎么来的呢?于是先将这个cookie在本地代码中显示设置,在本地调试下,果然出现了 401 Unauthorized 异常,可能就是这个cookie导致的问题。
决定看下Hutool工具包中HttpRequest类实现源码是如何自动设置cookie的。
我们的业务代码
1 | String result = HttpRequest.get(url) // 设置请求url |
上面都是设置请求需要的参数,看下HttpRequest中的execute() 方法
1 | /** |
继续跟踪
1 | /** |
进入到 initConnecton() 方法
1 | /** |
this.httpConnection.setCookie(this.cookie); 可以看到如果我们显示指定了cookie,这里会通过 HttpConnection 中的 setCookie 方法进行设置
1 | /** |
这里我们在代码中并没有指定cookie,那么代码中是否在其他地方调动了这个方法呢。
于是在setCookie 方法中打个断点,运行代码调试下看看,从IDEA中的Frames窗口中可以定位到调用setCookie 方法的地方,果然在 HttpConnection 的 initConn 方法中会调用setCookie 方法,从 CookiePool 中根据url里的host获取cookie。

我们看下 CookiePool 这个类,该类内部为了一个静态的Map,key是host, value是cookies字符串,CookiePool 用于模拟浏览器的Cookie,当访问后站点,记录Cookie,下次再访问这个站点时,一并提交Cookie到站点。也就是说以后的请求都会携带这个cookie。
1 | package com.xiaoleilu.hutool.http; |
那么这个cookie是从哪里来的呢?继续看下 CookiePool 中的 put 方法在哪些地方被调用了,在 HttpConnection 类中找到了 storeCookie 方法
1 | /** |
在HttpRequest中的 execute() 方法发送请求之后,获取响应数据的时候会调用 httpConnection.getInputStream(),获取服务端返回的信息时,从响应头中提取Set-Cookie字段的值,保存到CookiePool中。
原来是我们大部分的接口都是根据第三方接口,通过在请求header中添加 X_API_KEY用于接口验证,而有一个接口第三方并没有提供,于是我们通过模拟登录的方式登录到网站来抓取数据,就是在调动登录接口的时候,第三方服务端在响应中返回了 Set-Cookie 信息,而Hutool工具会从响应中提取 Set-Cookie信息保存在CookiePool 中,并在后续请求中携带这个cookie。
第三方网站登录接口返回的cookie

至此,问题已经定位到了,既然我们不想要这个cookie,那么可以在模拟登录调用第三方接口之后,调用CookiePool 中的put方法将host对应的cookie重置为null,这样同一个host的其他请求就不会携带cookie了。
1 | // 清除cookie |
总结,本文通过tcpdump抓包工具,查看完整的HTTP请求,分析了Hutool工具发送HTTP请求过程的源码,最终定位并解决了问题。
CPU密集型程序,一个完整请求的I/O操作可以在很短的时间内完成,CPU还有很多运算要处理,也就是说CPU运算的比例占很大一部分,线程等待时间接近0。
对于单核CPU处理CPU密集型程序,这种情况不太适合使用多线程,对于多核CPU处理CPU密集型程序,我们完全可以最大化的利用CPU核心数,应用并发编程提高效率。
CPU密集型程序的最佳线程数就是:理论上线程数量 = CPU核数(逻辑),但是实际上数量一般会设置为CPU核数(逻辑)+ 1(经验值),
CPU密集型的线程恰好在某时因为发生一个页错误或者因其他原因而暂停,刚好有一个“额外”的线程,可以确保在这种情况下CPU周期不会中断工作。
与CPU密集型程序相对,一个完整请求的CPU运算操作完成之后还有很多I/O操作要做,也就是说I/O操作占比很大部分,等待时间较长,线程等待时间所在比例越高,需要越多线程;
线程CPU时间所占比例越高,需要越少线程。
1、I/O密集型程序的最佳线程数就是:最佳线程数 = CPU核心数(1 / CPU 利用率) = CPU核心数(1 + (I/O耗时 / CPU耗时));
2、如果几乎全是I/O耗时, 那么CPU耗时就无限趋近于0,所以纯理论就可以说是2N(N=CPU核数),当然也有说2N+1的,1应该是backup。
3、一般我们说2N+1即可。