geekymv

Do one thing, do it well.


  • 首页

  • 分类

  • 归档

  • 标签

  • 关于

谈谈JVM内存区域的划分

发表于 2021-03-03 | 分类于 JVM

对 Java 程序员来说我们不用自己手动管理对象内存的申请与释放,全部交由 Java 虚拟机(JVM)来管理内存的分配与回收。
因此,日常开发中我们不用关心内存分配与回收,减少了很多繁琐的工作,大大提高了开发效率。
也正是因为如此,一旦出内存泄漏和溢出方面的问题,如果不了解 JVM 内部的内存结构、工作机制,那么排查问题将变得异常艰难。

接下来,我们一起学习 JVM 内存区域的划分、作用以及可能产生的问题。

根据 Java 虚拟机规范,Java 虚拟机在执行 Java 程序的过程中会把它所管理的内存划分为几个不同的数据区域,如下所示:
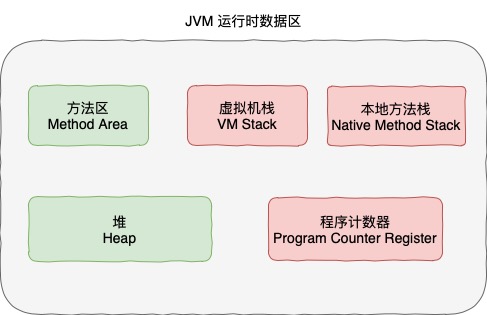
其中,有些区域会在虚拟机进程启动的时候创建,由所有线程共享。还有些区域则在用户线程的启动的时候创建,线程结束的时候销毁。
这部分区域则是线程私有的。JVM 内存区域主要分为线程共享区域(Java堆、方法区)、线程私有区域(程序计数器、虚拟机栈、本地方法栈)。
阅读全文 »

ArrayList 扩容策略

发表于 2021-03-01

ArrayList 在我们日常开发中用到的非常多,我们知道ArrayList 内部是通过数组实现的,而数组的长度一经定义,就无法更改了。

那么问题就来了,ArrayList是如何实现扩容的呢?

ArrayList 的成员变量

1
2
3
4
5
6
7
8
9
10
11
12
13
14
15
16
17
18
19
20
21
22
23
24
25
26
27
28
29
30
31
32
33
34
35
36
37
38
39
40
41
/**
* Default initial capacity.
* 默认的初始容量10。
*/
private static final int DEFAULT_CAPACITY = 10;

/**
* Shared empty array instance used for empty instances.
* 共享的空数组实例,用于空实例。
*/
private static final Object[] EMPTY_ELEMENTDATA = {};

/**
* Shared empty array instance used for default sized empty instances. We
* distinguish this from EMPTY_ELEMENTDATA to know how much to inflate when
* first element is added.
*
* 共享的空数组实例,用于默认大小的空实例。
* 我们区分 DEFAULTCAPACITY_EMPTY_ELEMENTDATA 和 EMPTY_ELEMENTDATA
* 为了知道添加第一个元素时要扩容多少。
*/
private static final Object[] DEFAULTCAPACITY_EMPTY_ELEMENTDATA = {};

/**
* The array buffer into which the elements of the ArrayList are stored.
* The capacity of the ArrayList is the length of this array buffer. Any
* empty ArrayList with elementData == DEFAULTCAPACITY_EMPTY_ELEMENTDATA
* will be expanded to DEFAULT_CAPACITY when the first element is added.
*
* Object[] 用于实际存储 ArrayList 的元素。ArrayList 的容量是数组的长度。
* 当添加第一个元素的时候,任何空的ArrayList(elementData == DEFAULTCAPACITY_EMPTY_ELEMENTDATA)
* 容量将被增加到DEFAULT_CAPACITY。
*/
transient Object[] elementData; // non-private to simplify nested class access

/**
* The size of the ArrayList (the number of elements it contains).
* ArrayList 的大小(ArrayList 中包含的元素个数)
* @serial
*/
private int size;

问题二:ArrayList 源码中为何定义两个 Object[] 呢?它们各有什么用处?

阅读全文 »

新来的同事问了我一个Mybatis中@Param问题,我懵逼了

发表于 2020-12-14

详解冒泡排序,不能再详细了!

发表于 2020-12-11

在我们日常开发中,排序是非常常见的一种需求,提供一组数据元素,把这些数据元素按照一定的规则进行排序。比如微信公众号的文章是按照文章的发布时间进行排序,再比如在电商类APP中查询一些商品,按照商品的价格进行排序,更复杂的会根据用户的喜好进行排序。

在平常的项目中,简单的排序需求我们可以使用数据库提供的order by 语句进行排序,我们也可以使用JDK提供的工具方法(比如Arrays.sort())进行排序,这些排序方式都是别人封装好的,内部肯定使用了某种排序算法。我们有必要去了解一些经典的排序算法,接下来的几篇文章将介绍一些常见的排序算法:冒泡排序、选择排序、插入排序、希尔排序、归并排序、快速排序、计数排序、基数排序、桶排序。其中快速排序甚至被誉为20世纪科学和工程领域的十大算法之一。

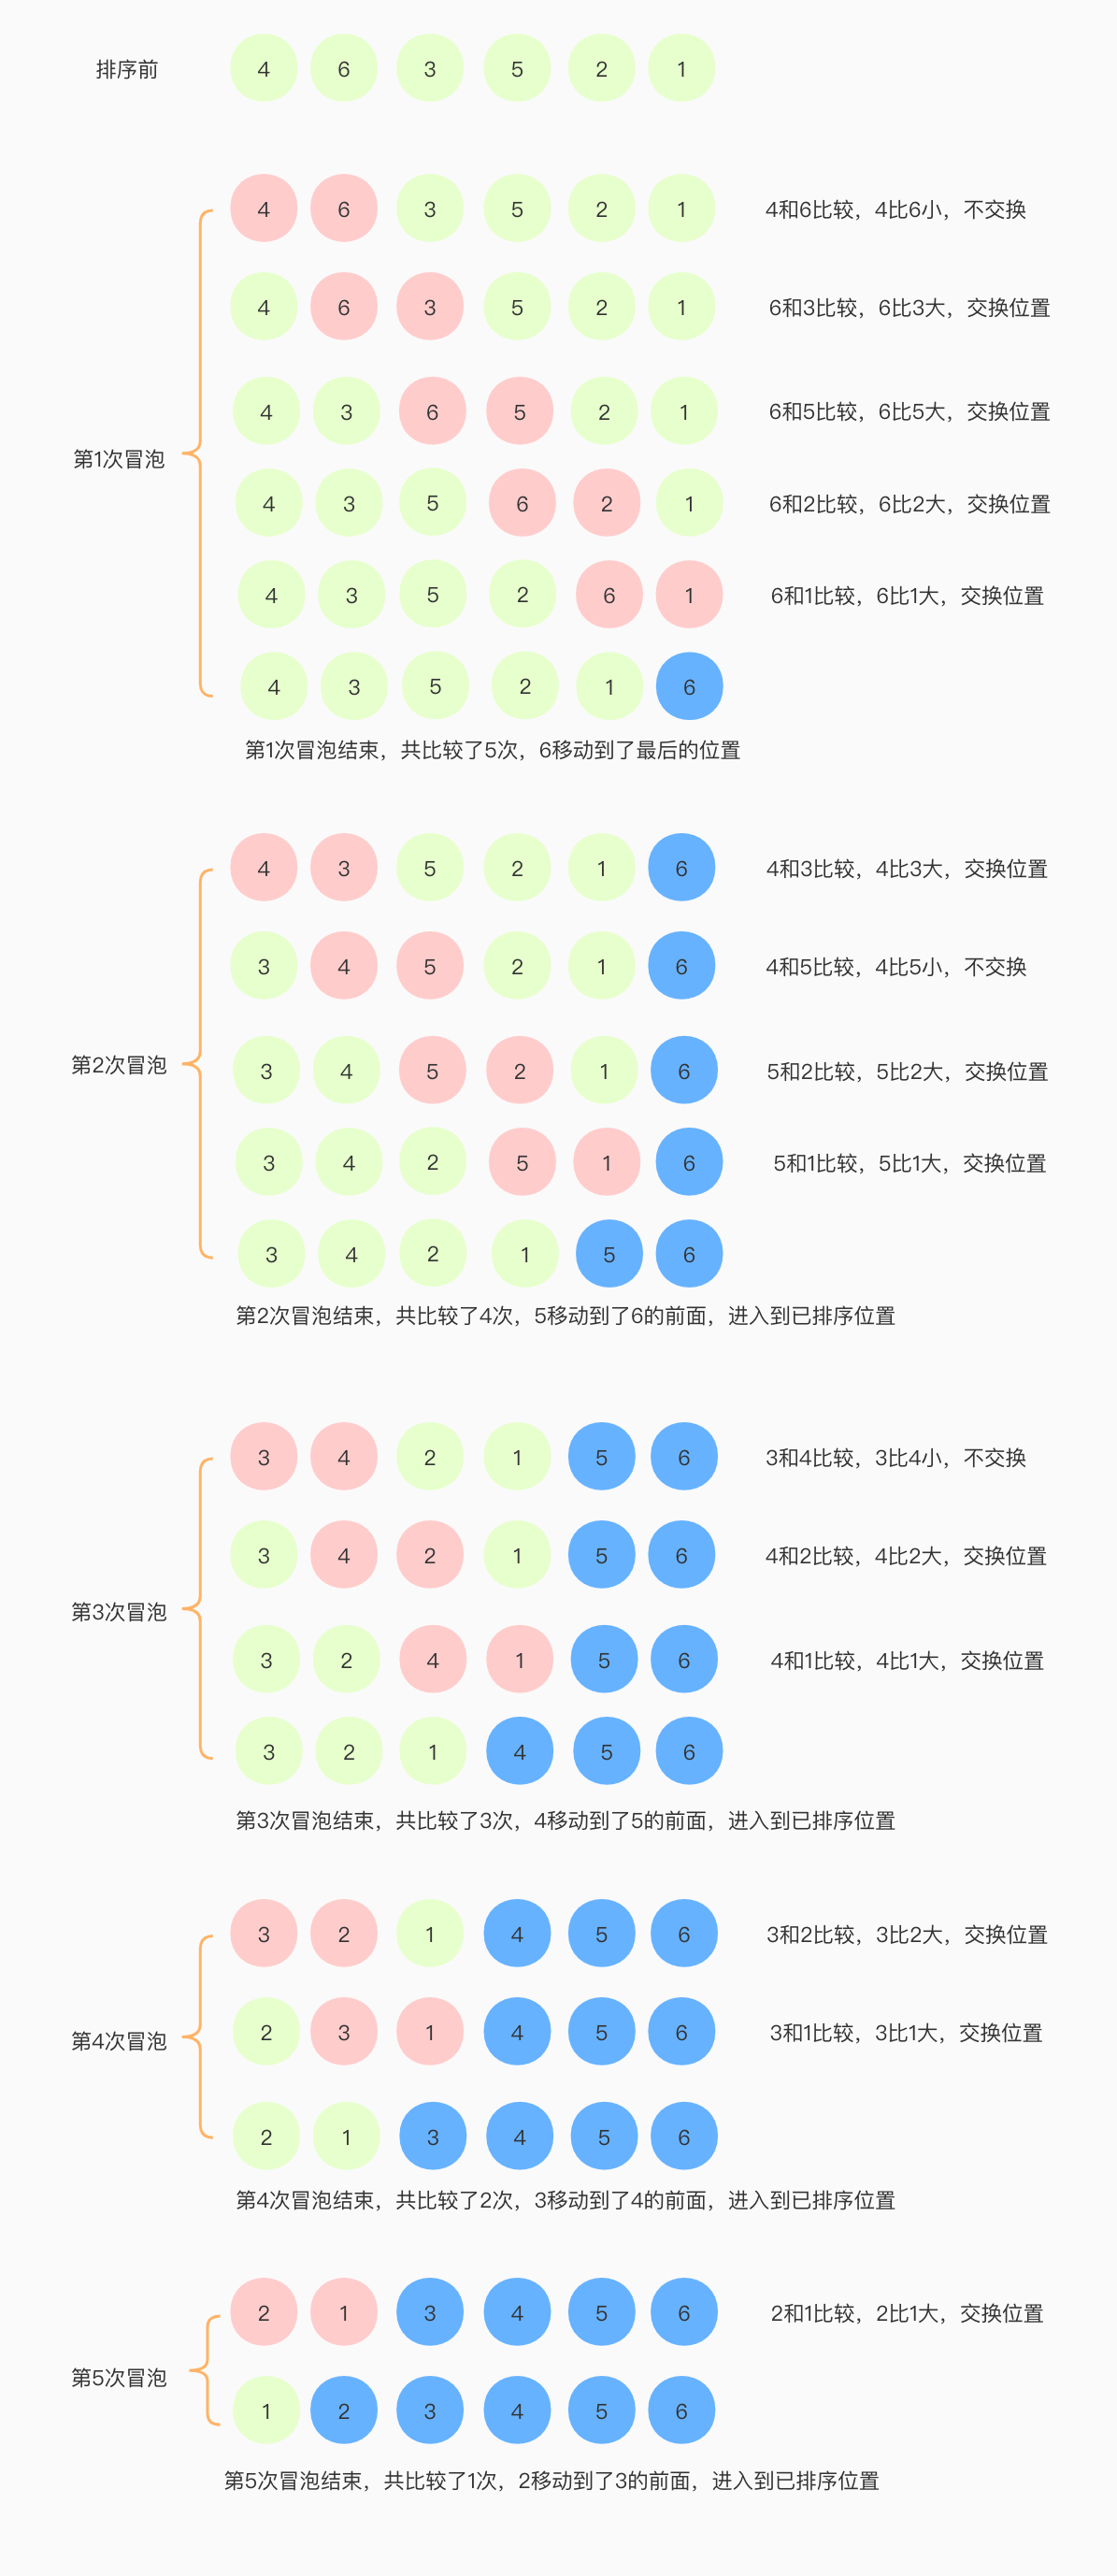
本篇文章将介绍冒泡排序,冒泡排序应该是我们最早接触到的一种排序算法了,记得笔者应该是在C语言课上接触到的冒泡排序,那时候不是很理解,只是记住了代码实现。接下来我将一步一步演示冒泡排序的过程。

冒泡排序

冒泡排序(Bubble Sort)是一种简单的排序算法,它通过依次比较相邻的两个元素,判断两个元素是否满足大小关系,如果不满足则交换两个元素,每一次冒泡会让至少一个元素移动到它应该在的位置,这样n次冒泡就完成了n个数据的排序工作。这个算法的排序过程与气泡从水中往上冒的情况很相似,故美其名曰:冒泡排序。

需求:

排序前:4, 6, 3, 5, 2, 1

排序后:1, 2, 3, 4, 5, 6

算法过程:

  • 比较相邻的元素,如果前一个元素比后一个元素大,就交换这两个元素;
  • 对每一对相邻元素做同样的操作,从开始第一对元素到结尾最后一对元素,最终最后位置的元素就是最大值。
  • 除了已排序的,针对剩余所有的元素重复上述两个步骤;
  • 重复前三步,直到排序完成。

每一次冒泡会让至少一个元素移动到它应该在的位置,右边是已排序位置,左边是未排序位置。

可以发现,每经过一次冒泡会让至少一个元素移动到它应该在的位置,比如第3次冒泡之后元素4、5、6已经进入已排序位置,它们没必要参与后续的冒泡了。

最后剩下一个元素1,没有继续冒泡的必要了,6个元素最多经过5次冒泡,就可以完成排序。

为了便于理解冒泡排序的过程,我从网上找了一幅动图给大家:

代码实现

1
2
3
4
5
6
7
8
9
10
11
12
13
14
15
16
17
18
19
20
21
22
23
24
25
26
27
28
29
30
31
import java.util.Arrays;

public class BubbleSort {

public void sort(int[] arr) {
int len = arr.length;
for(int i = 0; i < len-1; i++) {
System.out.print("第" + (i+1) + "次冒泡");

for(int j = 0; j < len-1 - i; j++) { // 参与冒泡的元素索引
if(arr[j] > arr[j+1]) {
swap(arr, j, j+1);
}
}
System.out.println(Arrays.toString(arr));
}
System.out.println("排序后:" + Arrays.toString(arr));
}

/**
* 交换元素
* @param arr
* @param i
* @param j
*/
public void swap(int[] arr, int i, int j) {
int temp = arr[i];
arr[i] = arr[j];
arr[j] = temp;
}
}

上述代码存在一个问题,就是当元素已经有序的时候,程序还是会继续冒泡无法提前结束,我们可以通过一个交换的标识位来判断是否需要提前结束,代码如下

1
2
3
4
5
6
7
8
9
10
11
12
13
14
15
16
17
18
19
20
public void sort(int[] arr) {
int len = arr.length;
for(int i = 0; i < len-1; i++) {
System.out.print("第" + (i+1) + "次冒泡");
// 是否交换的标识位,用于提前结束冒泡
boolean flag = false;
for(int j = 0; j < len-1 - i; j++) { // 参与冒泡的元素索引
if(arr[j] > arr[j+1]) {
swap(arr, j, j+1);
flag = true;
}
}
System.out.println(Arrays.toString(arr));

if(!flag) {
break;
}
}
System.out.println("排序后:" + Arrays.toString(arr));
}
总结

1、冒泡排序的时间复杂度是多少?

最好情况下,要排序的数据已经是有序的了,我们只需要进行1次冒泡操作,所以最好情况的时间复杂度是O(n),而最坏的情况是,要排序的数据刚好是相反的,我们需要进行n-1次冒泡操作,所以最坏情况的时间复杂度为O(n^2)。

2、冒泡排序的空间复杂度是多少?

冒泡排序过程只涉及相邻数据的交换操作,只需要常量级的临时空间,所以它的空间复杂度为O(1)。

3、冒泡排序是稳定的排序算法吗?

冒泡排序过程,只有交换才可以改变两个元素的前后顺序,为了保证冒泡排序算法的稳定性,当相邻的两个元素大小相等的时候,我们不去做交换,相等的两个元素排序前后顺序保持不变,所以冒泡排序是稳定的排序算法。

minio

发表于 2020-09-18
1
2
3
4
5
6
7
8
9
10
11
12
https://rplib.cn/archives/da-jian-zi-ji-de-fen-bu-shi-yun-cun-chu-minio.html

配置客户端
./mc config host add minio7 http://10.0.213.7:8000 ACCESS_KEY SECRET_KEY
./mc config host add minio9 http://10.0.213.9:9000 ACCESS_KEY SECRET_KEY

测试连通性
./mc ls minio9
./mc ls minio7

对拷镜像
./mc mirror $SrcCluster/$srcBucket $DestCluster

数据迁移

https://www.jianshu.com/p/5c6bc2e3b886

Java中Integer类有坑吗

发表于 2020-05-14
一切皆对象?

我们知道Java是一门面向对象的编程语言,但是原始数据类型(boolean、byte、short、char、int、float、double、long)并不是对象。
Integer 是int 对应的包装类,它内部包含一个int 类型的成员变量用于存储数据。

1
2
3
4
5
6
/**
* The value of the {@code Integer}.
*
* @serial
*/
private final int value;

Integer 类提供了基础的常量比如最大值、最小值等,还是一些方法比如转换为不同进制的字符串、int和字符串之间的转换等。

1
2
3
4
// 将字符串数字转换成int   
public static int parseInt(String s) throws NumberFormatException {
return parseInt(s,10);
}

自动装箱、自动拆箱

在Java5中引入了自动装箱(auto boxing)和自动拆箱(auto unboxing)的功能,
自动装箱和自动拆箱是一种语法糖,Java根据上下文自动进行转换,它发生在编译阶段,可以保证不同的写法在运行时等价,极大地简化了编程。
示例代码

1
2
3
4
5
6
7
public class IntegerTest {

public static void main(String[] args) {
Integer i = 100;
int j = i + 1;
}
}

反编译一下 javap -v IntegerTest.class,部分输出结果如下:

1
2
3
4
5
6
7
8
9
10
11
12
13
14
15
16
17
18
19
20
21
22
23
public static void main(java.lang.String[]);
descriptor: ([Ljava/lang/String;)V
flags: ACC_PUBLIC, ACC_STATIC
Code:
stack=2, locals=3, args_size=1
0: bipush 100
2: invokestatic #2 // Method java/lang/Integer.valueOf:(I)Ljava/lang/Integer;
5: astore_1
6: aload_1
7: invokevirtual #3 // Method java/lang/Integer.intValue:()I
10: iconst_1
11: iadd
12: istore_2
13: return
LineNumberTable:
line 6: 0
line 8: 6
line 9: 13
LocalVariableTable:
Start Length Slot Name Signature
0 14 0 args [Ljava/lang/String;
6 8 1 i Ljava/lang/Integer;
13 1 2 j I

这里我们主要关注这两行反编译的代码(其他部分代码,感兴趣的朋友可以参考我的另一篇文章)

1
2
2: invokestatic  #2                  // Method java/lang/Integer.valueOf:(I)Ljava/lang/Integer;
7: invokevirtual #3 // Method java/lang/Integer.intValue:()I

可以看出,Java在编译阶段自动把装箱转换为Integer.valueOf(),把拆箱转换为Integer.intValue()

Integer的值缓存IntegerCache

我们先看段代码,大家可以先猜测下运行结果

1
2
3
4
5
6
7
8
9
10
11
12
13
14
15
16
public class IntegerCacheTest {

public static void main(String[] args) {

Integer i1 = 100;
Integer i2 = 100;

System.out.println(i1 == i2);

Integer i3 = 200;
Integer i4 = 200;

System.out.println(i3 == i4);
}

}

实际输出结果:
true
false

Integer i = 100 这行代码涉及到了自动装箱,通过上面分析我们知道自动装箱调用了Integer.valueOf()方法,
这个时候我们有必要看下Integer.valueOf()方法的源代码了。

1
2
3
4
5
6
7
8
9
10
11
12
13
14
15
16
17
18
19
20
/**
* Returns an {@code Integer} instance representing the specified
* {@code int} value. If a new {@code Integer} instance is not
* required, this method should generally be used in preference to
* the constructor {@link #Integer(int)}, as this method is likely
* to yield significantly better space and time performance by
* caching frequently requested values.
*
* This method will always cache values in the range -128 to 127,
* inclusive, and may cache other values outside of this range.
*
* @param i an {@code int} value.
* @return an {@code Integer} instance representing {@code i}.
* @since 1.5
*/
public static Integer valueOf(int i) {
if (i >= IntegerCache.low && i <= IntegerCache.high)
return IntegerCache.cache[i + (-IntegerCache.low)];
return new Integer(i);
}

这里涉及到一个很重要的类IntegerCache,下面是IntegerCache类的源码:

1
2
3
4
5
6
7
8
9
10
11
12
13
14
15
16
17
18
19
20
21
22
23
24
25
26
27
28
29
30
31
32
33
34
35
36
37
38
39
40
41
42
43
/**
* Cache to support the object identity semantics of autoboxing for values between
* -128 and 127 (inclusive) as required by JLS.
*
* The cache is initialized on first usage. The size of the cache
* may be controlled by the {@code -XX:AutoBoxCacheMax=<size>} option.
* During VM initialization, java.lang.Integer.IntegerCache.high property
* may be set and saved in the private system properties in the
* sun.misc.VM class.
*/
private static class IntegerCache {
static final int low = -128;
static final int high;
static final Integer cache[];

static {
// high value may be configured by property
int h = 127;
String integerCacheHighPropValue =
sun.misc.VM.getSavedProperty("java.lang.Integer.IntegerCache.high");
if (integerCacheHighPropValue != null) {
try {
int i = parseInt(integerCacheHighPropValue);
i = Math.max(i, 127);
// Maximum array size is Integer.MAX_VALUE
h = Math.min(i, Integer.MAX_VALUE - (-low) -1);
} catch( NumberFormatException nfe) {
// If the property cannot be parsed into an int, ignore it.
}
}
high = h;

cache = new Integer[(high - low) + 1];
int j = low;
for(int k = 0; k < cache.length; k++)
cache[k] = new Integer(j++);

// range [-128, 127] must be interned (JLS7 5.1.7)
assert IntegerCache.high >= 127;
}

private IntegerCache() {}
}

通过javadoc 可以获知Integer 的缓存范围默认是-128到127,
当然缓存上限值也是可以根据需要调整的,JVM提供了参数设置-XX:AutoBoxCacheMax=<size>,这也就解释了上述代码中i1 == i2 结果为true,
而i3 == i4 为false的根本原因,即在-128到127(包含)之间的数值都是IntegerCache.cache[] 数组中到同一个Integer对象。

举一反三,这种缓存机制并不只有Integer才有,同样存在于其他一些包装类:

  • Boolean,缓存了true/false实例
  • Byte,数值全部被缓存
  • Short,缓存了-128到127之间到数值
  • Character,缓存范围’\u0000’到’\u007f’(0到127)
  • Long,缓存了-128到127之间到数值
如何正确比较Integer值

通过上面分析,我们发现了两个都是200的Integer变量i3和i4使用==比较的结果为false,那么我们该如何比较两个Integer类型的值呢?
其实我们想要比较的是Integer类中的value值,我们可以使用equals进行值的比较,
通过阅读Integer类的源码,发现Integer类重写了java.lang.Object类的equals方法,如下:

1
2
3
4
5
6
7
8
9
10
11
12
13
14
15
16
/**
* Compares this object to the specified object. The result is
* {@code true} if and only if the argument is not
* {@code null} and is an {@code Integer} object that
* contains the same {@code int} value as this object.
*
* @param obj the object to compare with.
* @return {@code true} if the objects are the same;
* {@code false} otherwise.
*/
public boolean equals(Object obj) {
if (obj instanceof Integer) {
return value == ((Integer)obj).intValue();
}
return false;
}

我们在实际开发中,经常会遇到比较Integer、Long类型值大小,这里要特别注意不能直接使用==,而应该使用equals方法。

注意事项

  • 基本数据类型都有取值范围,特别注意越界问题,当一个大的数值与另一个大的数值进行相加或相乘容易出现越界
  • 慎用基本数据类型存储货币,如果采用double会带来一定的误差,常采用BigDecimal、整型(比如金额要精确到分,可将其扩大100倍转换成整型存储)
  • 优先使用基本数据类型,原则上要避免自动装箱、拆箱行为,尤其是在性能敏感的场景
  • 如果有线程安全的计算,建议考虑使用类似AtomicInteger、AtomicLong 这样线程安全类。

这里简单说下基础数据类型越界问题,因为之前没太注意,在一个项目中就遇到过这个问题。记得代码中需要计算一个月的毫秒数,
开始代码是这么写的

1
long ONE_MONTH = 3600 * 24 * 1000 * 30;

看起来没什么问题,实际运行结果却是个负数,这显然是超过int范围了,如果改成

1
long ONE_MONTH = 3600 * 24 * 1000 * 30L;

结果就是正确的了。

crontab

发表于 2020-03-09

添加任务
crontab -e

查看任务列表
crontab -l

tomcat

发表于 2020-03-09

tomcat 线程池
org.apache.catalina.core.StandardThreadExecutor

https://blog.csdn.net/huangshanchun/article/details/78567501?utm_source=blogxgwz9

mysql-config

发表于 2020-03-09

查看最大连接数

1
show variables like 'max_connections';

mysql 启动配置参数文件位置

1
mysql --help | grep my.cnf
mysql 日志

错误日志

1
show variables like '%log_error%'\G;

慢查询日志

1
2
show variables like '%slow_query%';
show variables like '%long_query_time%';

修改 my.cnf,在 [mysqld] 添加下面配置

1
2
3
slow_query_log=ON
slow_query_log_file=/var/log/mysql-slow-log.log
long_query_time=3

有可能没有创建/var/log/mysql-slow-log.log权限,手动创建并修改用户组

二进制日志(bin log)

1
2
3
4
5
6
7
server-id=1
log-bin=mysql-bin
binlog-format=ROW
# 指定db
binlog-do-db=backup_cloud
# 日志保留时间
expire_logs_days=15

show variables like ‘%log_bin%’;

let's-encrypt

发表于 2019-09-10

https://certbot.eff.org/

1
2
3
4
$ wget https://dl.eff.org/certbot-auto
$ sudo mv certbot-auto /usr/local/bin/certbot-auto
$ sudo chown root /usr/local/bin/certbot-auto
$ sudo chmod 0755 /usr/local/bin/certbot-auto
1
$ sudo /usr/local/bin/certbot-auto --nginx
1
2
Could not choose appropriate plugin: The nginx plugin is not working; there may be problems with your existing configuration.
The error was: NoInstallationError("Could not find a usable 'nginx' binary. Ensure nginx exists, the binary is executable, and your PATH is set correctly.",)

由于没有将nginx放到环境变量中,设置nginx软连接

1
2
$ ln -s /usr/local/nginx/sbin/nginx /usr/bin/nginx
$ ln -s /usr/local/nginx/conf/ /etc/nginx

1
2
3
4
$ sudo /usr/local/bin/certbot-auto --nginx
Saving debug log to /var/log/letsencrypt/letsencrypt.log
The nginx plugin is not working; there may be problems with your existing configuration.
The error was: PluginError('Nginx build is missing SSL module (--with-http_ssl_module).',)

https://blog.csdn.net/guangcaiwudong/article/details/98858337

通过nginx -V查看nginxconfigure arguments没有安装ssl模板,在nginx目录中重新构建
cd /opt/nginx-1.14.0
./configure –with-http_ssl_module
执行 make
这里不要进行make install,否则就是覆盖安装。

Nginx安装后增加SSL模块

使用sudo certbot certonly --nginx生成证书,中间需要填写email和域名,生成成功后会提示证书存放路径:

1
2
3
4
5
6
7
8
9
10
11
12
13
14
15
16
17
18
19
20
21
22
23
24
25
26
27
28
29
30
31
32
33
34
35
36
37
38
39
40
41
42
43
44
45
46
47
48
49
50
51
52
$ sudo /usr/local/bin/certbot-auto --nginx
Saving debug log to /var/log/letsencrypt/letsencrypt.log
Plugins selected: Authenticator nginx, Installer nginx
Enter email address (used for urgent renewal and security notices) (Enter 'c' to
cancel): c
An e-mail address or --register-unsafely-without-email must be provided.
[root@VM_0_13_centos nginx]# sudo /usr/local/bin/certbot-auto --nginx
Saving debug log to /var/log/letsencrypt/letsencrypt.log
Plugins selected: Authenticator nginx, Installer nginx
Enter email address (used for urgent renewal and security notices) (Enter 'c' to
cancel): [email protected]

- - - - - - - - - - - - - - - - - - - - - - - - - - - - - - - - - - - - - - - -
Please read the Terms of Service at
https://letsencrypt.org/documents/LE-SA-v1.2-November-15-2017.pdf. You must
agree in order to register with the ACME server at
https://acme-v02.api.letsencrypt.org/directory
- - - - - - - - - - - - - - - - - - - - - - - - - - - - - - - - - - - - - - - -
(A)gree/(C)ancel: A

- - - - - - - - - - - - - - - - - - - - - - - - - - - - - - - - - - - - - - - -
Would you be willing to share your email address with the Electronic Frontier
Foundation, a founding partner of the Let's Encrypt project and the non-profit
organization that develops Certbot? We'd like to send you email about our work
encrypting the web, EFF news, campaigns, and ways to support digital freedom.
- - - - - - - - - - - - - - - - - - - - - - - - - - - - - - - - - - - - - - - -
(Y)es/(N)o: N
No names were found in your configuration files. Please enter in your domain
name(s) (comma and/or space separated) (Enter 'c' to cancel): npe4j.com
Obtaining a new certificate
Performing the following challenges:
http-01 challenge for npe4j.com
Using default address 80 for authentication.
Waiting for verification...
Cleaning up challenges
Could not automatically find a matching server block for npe4j.com. Set the `server_name` directive to use the Nginx installer.

IMPORTANT NOTES:
- Unable to install the certificate
- Congratulations! Your certificate and chain have been saved at:
/etc/letsencrypt/live/npe4j.com/fullchain.pem
Your key file has been saved at:
/etc/letsencrypt/live/npe4j.com/privkey.pem
Your cert will expire on 2019-12-09. To obtain a new or tweaked
version of this certificate in the future, simply run certbot-auto
again with the "certonly" option. To non-interactively renew *all*
of your certificates, run "certbot-auto renew"
- Your account credentials have been saved in your Certbot
configuration directory at /etc/letsencrypt. You should make a
secure backup of this folder now. This configuration directory will
also contain certificates and private keys obtained by Certbot so
making regular backups of this folder is ideal.

nginx从http跳转到https
https://www.cnblogs.com/nuccch/p/7681592.html

CentOS 7 下 安装 Let’s Encrypt 的通配符证书

sudo yum install epel-release
sudo yum install certbot

certbot –server https://acme-v02.api.letsencrypt.org/directory -d npe4j.com -d *.npe4j.com –manual –preferred-challenges dns-01 certonly

https://qizhanming.com/blog/2019/04/23/how-to-install-let-s-encrypt-wildcards-certificate-on-centos-7
https://www.infoq.cn/article/2018/03/lets-encrypt-wildcard-https
https://www.jianshu.com/p/c5c9d071e395

删除弃用的Let’s encrypt安全证书的域名
https://www.vmvps.com/how-to-delete-unused-lets-encrypt-ssl-domain.html

Let’s Encrypt 续期

crontab -e

0 1 /usr/local/bin/certbot-auto renew –no-self-upgrade
5 1
/usr/sbin/nginx -s reload

强制更新
–force-renew

查看日志
tail -F /var/log/letsencrypt/letsencrypt.log

查看crontab 日志
tail -30f /var/log/cron

报错
Could not find a usable ‘nginx’ binary. Ensure nginx exists, the binary is executable, and your PATH is set correctly

https://www.jianshu.com/p/1ce5f1bc8f0d

1…345…11

geekymv

110 日志
8 分类
23 标签
© 2022 geekymv
由 Hexo 强力驱动
| 总访问量次 | 总访客人 |
主题 — NexT.Muse v5.1.4